

My husband is a do-it-yourself-er. He loves to buy items on Craigslist, fix them up and apply them to whatever project he feels like doing at the moment. He got these beautiful hurricane impact French doors for a really beautiful price. They were wood framed with huge panels of glass. They would have been perfect as patio doors, but he decided to replace our front doors with them. Front glass doors! I felt exposed to the world! Imagine anyone walking by from the outside looking in. At first, I just nailed a sheet up from one wall to the other until I figured out what to do with the glass. After one week, I was tired of walking into the white sheet every time I opened the door! So I got to work and started researching.
There were many different options for me:
- Drapes – Drapes can enhance a room or transform it completely. I had had enough of my white ‘drape’ so I ixnayed this one.
- Blinds – I was not willing to put holes in my new doors.
- Roman Shades – Ditto
- Shutters – Ditto
- Etching – This one showed promise but the word ‘etch’ sounded a little too permanent for me
- Frosting – This was more like it!
I chose one that was cheap, and gave me the opportunity to be creative. Anything to add a little personality!
I know some of you may be wary of doing something like this. How permanent is it? Can frosting spray be removed from glass? I assure you it is only as permanent as you want it to be and the removal is not that difficult.
To frost the door, I used:
- Rust-Oleum Frosted Glass Spray
- Contact Paper
- Xacto Knife
- Self healing cutting mat
- Painters Tape
- Drop cloths, garbage bags, plastic, whatever you want to use to protect walls and door material from being frosted
- Windex glass cleaner
- Microfiber cloth X3
- Tweezers
- Good Ventilation
- Patience! Anything worth doing yourself takes time and energy
I’m a night owl, so some of these pictures may look a little dark. It’s about 2:00 in the morning.
Step 1: Find your inspiration
It’s easy to say that, but much more difficult to do, and is the most important part. This is what everyone is going to see when they walk past your house. It should show your personality without taking away from the rest of the aesthetics of the house. Choose something that doesn’t change with your tastes, because you will be seeing it every day.
Brain fart? How about:
- Different fonts. You can do a monogram for your house:
- A mandala. There are some that are really intricate (remember you are going to cut each piece out so don’t overdo it. You’ll be crying by the end of your project)
- Nautical theme. I live in Florida, so this seems like a good one.
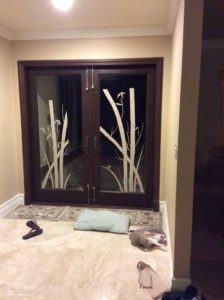
- Forest/Nature theme. I live in the forest so I wanted to keep my theme nature related. I chose bamboo.
- Words/quotes Be careful with this one. Sometimes you can overdo it. Keep it simple and keep it short. Unless you want to do something like this:

- Geometric or repeating pattern designs. This one is really good if you want a generic look. Diamond, circles, checkered…you can come up with tons of designs here. And hey, if there are a few you’d like to try, you can use it on your sliding glass door or even a window!
- Abstract design. Be creative!
Step 2: Make your Stencil
Measure the glass panel of your door and cut out your contact paper to match. This way you know exactly how much space you are dealing with, and it will help your design be balanced. I did a symmetrical design, so I really needed to focus on the measurement first.
On the back of your contact paper, draw your design. If you are not a free hander like I am, print out your picture, tape or glue it to the back of the contact paper.
Using the Xacto knife, start cutting out your picture.
If your plan is to frost most of the door with the picture as the negative space, cut out the pieces of your picture and arrange the picture as you go. My mistake? I arranged mine on the floor, so when it was time to transfer them on the front door, I got totally confused and spent more time than I needed to figure it out.
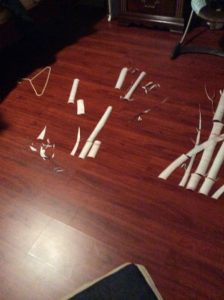
Arrange the pieces on something portable, and if there are lots of pieces, do a little at a time. Remember to measure as you go so there is no room for error!
If your plan is to just have a clear door with a frosted design, simply cut out the picture and follow the steps below. This one is much easier than what I did, but remember, I didn’t want anyone to get a show every time they passed by!
Step 3: Clean your glass
Use a microfiber cloth and Windex to thoroughly clean the glass. Make sure it is dry and free of dirt, dust or buildup of any kind.
Step 4: Arrange stencil on glass panel
If needed, use the tweezers to help you apply pieces to the inside of the door. As you arrange the stencil, step back from time to time to see what it looks like. This helps ensure:
- Your doors look balanced;
- You actually like what you see and are sure this is what you want. Just because you’ve done all of this work doesn’t mean you have to commit to what you’ve done. You can make different stencils and try them out before deciding what you want.
Step 5: Protect the area
The last thing you want is frosted wood. Or a frosted wall. Or frosted marble tile. I am a little OCD, so I taped plastic all around my door, not just the painter’s tape around the door frame closest to the glass. I also taped plastic to the floor.
The white sheet I had hung up on the wall? That came in pretty handy because the fumes didn’t go into the house. The frosting spray is pretty potent. The fumes are similar to spray paint, so do what you can to protect everyone inside from breathing these fumes in! I opened the other exterior doors and had a fan oscillating for proper ventilation.
Step 6: Clean glass a second time
You may think you didn’t leave any prints, but you would be surprised! This time spray a little cleaner on a clean microfiber cloth and wipe around the stencil or inside the stencil on the glass, not over the stencil. Messing with the contact paper too much can cause sections to come off the glass and compromise the picture.
Step 7: Spray away!
This is my front entryway door, so I simply opened the doors and started spraying. The following are the instructions directly from Rust-Oleum on how to properly use the frosting spray:
Shake can vigorously for one minute after the mixing ball begins to rattle. If mixing ball fails to rattle DO NOT STRIKE CAN. Contact Rust-Oleum. Hold can upright 10- 16″ from surface and spray in a steady back and forth motion, slightly overlapping each stroke. Keep the can the same distance from the surface. Keep the can in motion while spraying. Apply two or more wet coats a few minutes apart for best appearance. A wet coat should appear shiny as it is applied to the surfaces. WAIT 10 MINUTES FOR FROST EFFECT. Not for outdoor use. Do not use near open flame.
DRY & RECOAT Dry and recoat times are based on 70ºF (21°C) and 50% relative humidity. Allow more time at cooler temperatures. Dries completely in 5-10 minutes. May recoat at any time.
My doors took a little longer to dry because they are exterior doors, I live in Florida and it was about 80 degrees outside. For me one coat did it.
Step 8: Remove the stencil
Make sure the frosting is completely dry before you remove the stencil. I had my kids help me take the pieces off. It’s more fun having an audience when the final product is revealed!
I’m pretty happy with the way the doors came out. I’m very patient, so even though there were some bumps along the way with my arrangement of the stencil, I stuck with it. Everyone who visits comments on the door; many have thought I used frosting film, which is an alternative to doing it all yourself. But those who really know me, know that I put my heart and soul into my art, because they know that’s what I’m all about.
Here is the one downfall of my beautiful doors. My son was about three years old at the time I did them, and he would scratch at the door when my husband or I left the house. See the end result:
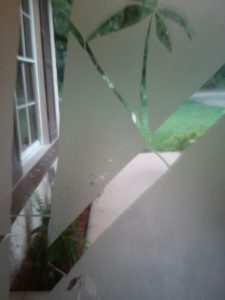
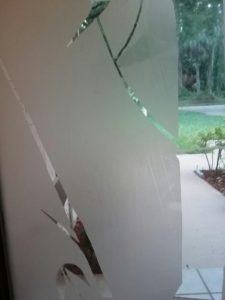
It may not seem like a lot but every time I notice it I cringe.
I’m thinking it may be time for a do-over. But this time, I may try doing something different. Since I do work a full-time job and am also a mom to three kids, I may have to go the easy route and try the film (forget about heart and soul right now!) It’s between that or etching (with etching cream, not a Dremel!). I’ll let you know what I decide to do, but before I even think about that, I have to take the frosting off the doors and maybe invest in a beaded curtain for privacy!